Cape Shoulder Hem
The shoulder hems of the cape of a cape dress may seem simple at first, but there are some details to consider. Wider hems of the cape cause two main issues: The cape hem sticking out and a corner forming at the shoulder. The wider the hem of the cape, the more these issues are taking effect. For a standard hem, being 1" wide and folded in twice, you should already consider this.
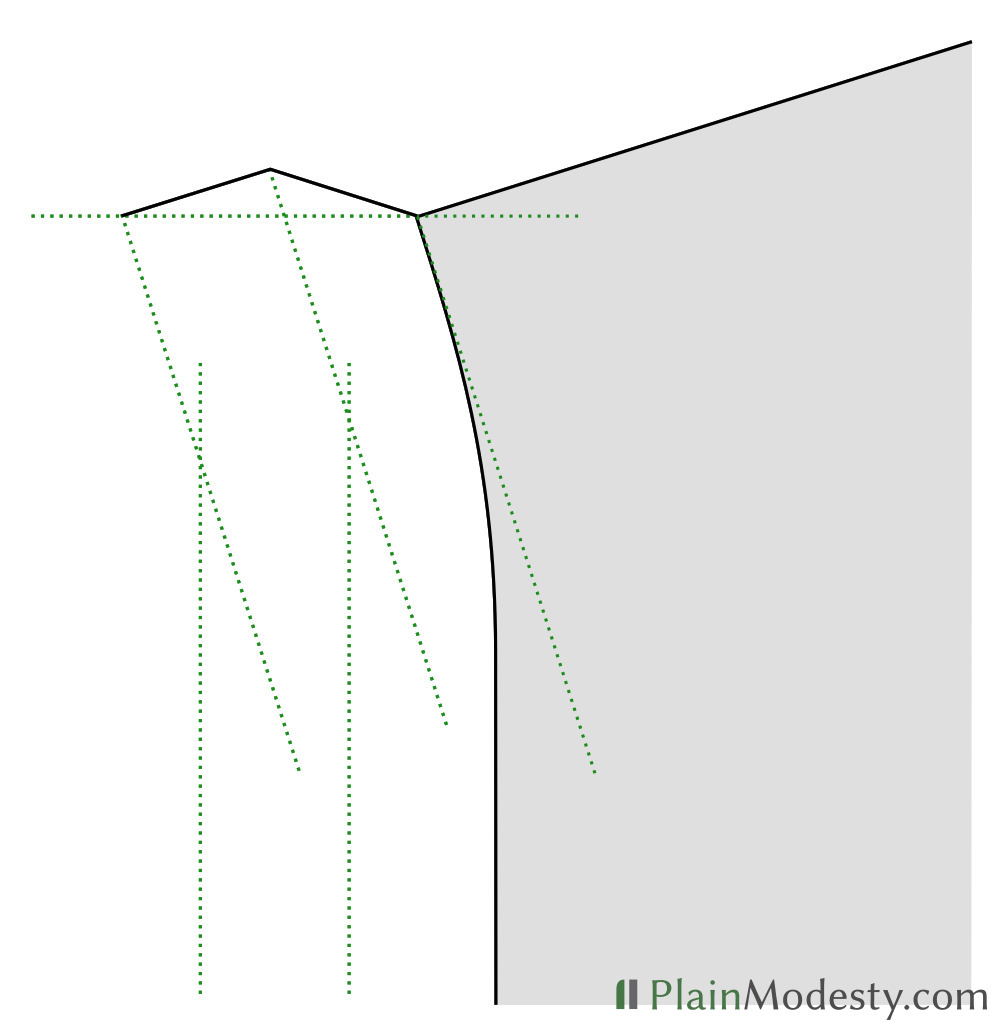
Shoulder Hem Corner
When sewing inclined shoulder seams on the cape, a corner will be formed, where the front and back are joined. The extent of this corner depends on the steepness of your shoulder and the slant of your cape. These pictures show the issue with a straight cape.


When hems don't meet in a right angle, like indicated by the red mark, they form a corner.
Straight capes form larger corners, while slanted capes form shallower corners.

On slanted capes, the angle between the shoulder hems is less and the corners are as well. A comparison to the straight cape is shown in gray.


In order to avoid the corners completely, the hems have to meet straight, without an angle.
This can be achieved by creating a curved hem.
The curve has to be adjusted, depending on the steepness of your shoulder.
It has to form a right angle with the hem at the shoulder seam.

Extend the shoulder seam by about ⅜". Draw a curved hem, starting at the cape, about 1⅝" away from the shoulder seam.

With the curved hem adjustment, the cape does not from a corner anymore and looks nice.

Shoulder Hem Shape
Depending on how the shoulder hem is added to your pattern, it will form a different shape and the finished cape will look different. There are multiple options to add the hem allowance to your pattern and each will result in a specific shape of the cape hem.
Image #1 extends the shoulder seam straight from the shoulder. Folding this hem in is not possible, because the hem length is to short to match the other folds.
Forcing it, will look like this.
Image #2 extends the the seam horizontally.
The cape will stick out from your shoulder.
Image #3 extends the shoulder seam upwards. It allows the hem to be folded easily, but the fabric will bulk up at the seam at the 2nd fold.
Image #4 extends the seam alternating. You can fold it in twice, even with wide hems and steep shoulders.
Both folds are matching the shoulder seam.
The cape will extend the shoulder in a straight line and look nice.

Usually, the cape hem will be sewn, based on the option in image #2. This results in a cape, with a protruding hem at the shoulder, like shown in these pictures.


Alternating Hem Allowance
Bringing together both improvements from the previous chapters, this picture shows the resulting pattern, as well as the final location of the folded hem.
Hems are usually folded in twice. Because the shoulder is slanted, the hem to be folded has to have different heights, to match the shoulder seam after folding. Each section of the hem has to have the same width and slant as the finished shoulder seam.


Finished Cape
The finished cape, using both improvements, looks fine at the shoulder, even with a wide hem and folded in twice.

 The improvements can be noticed, when comparing the pictures of the regular hem with the alternating hem.
Regular Hem
Alternating Hem

Regular Hem
Alternating Hem

Sewing
To create a cape with an alternating hem, start by modifying your cape pattern, using the step by step instructions from the gallery below.
If you don't want to modify a cape pattern on your own, you can use the pattern generator to create a customized printable pattern for free.
After cutting your cape, it should look like this. I have marked the seam allowance for illustration.
Be aware that the folding is different than usual: It doesn't fold circular but straight instead. In order to guide the folds, it is helpful to draw some lines on the hem.

The 1st fold, folds the outside part of the hem towards the lower end of the shoulder seam. With the 2nd fold, the high part of the hem, is folded to match upper section of the shoulder seam.
Fold the seam to make the guide lines meet. You may have to draw the fabric into shape a bit. Pin the curve into place with several pins. Begin with pinning the center and adding another pin at the end of the curved part of the cape. Carefully press the after each fold, starting from the shoulder seam and continuing towards the waist.

You should really press the hem, because otherwise it will lose its curved shape when sewing.
An alternative method to get the curve right, is to place a pin at each end of the curve. You can then move the center of the hem until it forms a continuous curve. Pin this curve in place using several pins, as described above, and press carefully.
Write a comment:
info@PlainModesty.com